
Few things match the sudden pang of anxiety that hits when a beautifully vibrant indoor canopy begins to droop, show unexplainable pale spots, or wilt right before your eyes. In a controlled, soil-less indoor garden, small symptoms can point to a rapid underground crisis. While you might initially double-check your grow lights or nutrient ratios, the real culprit often reveals itself as a swarm of tiny, dark insects flitting through your plants. These flying bugs are far more than an annoyance; their ravenous larvae live beneath the surface, chewing mercilessly on sensitive root tips. In indoor systems, this unchecked root pruning destroys the plant’s ability to take up nutrients, opening the door for systemic root rot.
The biggest mistake is waiting to treat the outbreak until the air is entirely full of swarming flies. I’ve seen many growers struggle with stalled vegetative growth simply because they left the flying parents alone to lay thousands of subterranean eggs. To immediately halt the airborne breeding loop without spilling toxic pesticide residues into your indoor living space, read our hands-on review of the safest sticky traps for potting soil and coco substrates to clean up your canopy air today.
Why Flying Bugs Thrive and Multiply Indoors
Indoor growing environments are specifically dialed in to give plants the ultimate advantage. We maintain consistent tropical warmth, stable relative humidity, and constant moisture inside the root containers. Unfortunately, these exact parameters also create a synthetic paradise for flying soil bugs like fungus gnats. Outside, cold snaps, torrential rains, and wild predatory insects keep their populations under strict natural control. Indoors, they have zero natural enemies to slow them down.
Most growers accidentally introduce these invaders themselves. The microscopic eggs and larvae frequently hitchhike inside low-grade bags of potting mix or pre-soaked starter plugs left open at the store. Once inside your room, the adult flies head straight for the damp topsoil or the green algae films forming on rockwool cubes. The adults don’t actually bite your leaves; they are simply drawn to the decay and humidity, transforming your warm, wet root zones into an active nursery for their lifecycle.
Step-by-Step Identification: Where to Track the Bugs
Before deploying a treatment plan, you must accurately locate and identify the insects. Grab a high-powered magnifying glass and carefully check these exact target zones:
- The Top Surface of Your Growing Medium: Look for a jerky, erratic crawling motion. Flying soil bugs are incredibly weak flyers and spend most of their time running across damp soil, coco, or rockwool faces.
- Floating Directly Under the Lower Fan Leaves: Shake the base of your pots gently. If a cloud of tiny, dark, mosquito-like insects emerges into the air, you are dealing with a mature fungus gnat colony.
- Just Below the Media Surface: Gently scratch away the top half-inch of your medium near the main stem. Look for tiny, clear-to-translucent wormlike maggots with a distinct, shiny black head capsule.
- The Exposed White Root Strings: Inspect the bottom drainage holes or pull a starter plug. Healthy roots must be pearly white and firm. If you find dull, slimy brown tips that look shredded or nibbled, larvae are actively feeding.
Read More: How to Tell the Difference Between Fruit Flies and Fungus Gnats on Houseplants?
The 3-Step Safe Organic Eradication Plan
You can completely wipe out a flying bug population without resorting to harsh chemical sprays that cause leaf scorch, leave toxic residues, or throw off your water line’s precise pH and PPM levels:
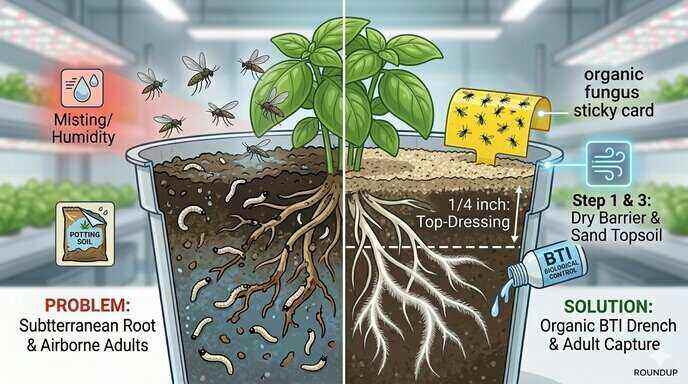
Step 1: Intercept and Bind the Breeding Adults
Immediately position yellow adhesive cards horizontally across the top rim of your plant containers. Because these insects possess specialized visual receptors that draw them irresistibly to yellow light spectrums, they will fly straight onto the glue. Capturing the adults is a critical first step because it immediately stops the daily deposition of fresh eggs.
Step 2: Drench the Medium with Microbial Soldiers (BTI)
Mix a safe, organic dose of Bacillus thuringiensis israelensis (BTI) into your fresh watering tank. Soak your growing medium thoroughly. BTI is a naturally occurring bacterium that targets the unique digestive tract of soil maggots. When the larvae eat it, they perish within hours, yet it remains 100% safe for your plant’s roots and preserves your water chemistry.
Step 3: Dehydrate the Surface Hatchery
Fungus gnat eggs and young larvae cannot survive without constant, saturated moisture at the surface. Let your potting soil or coco coir dry out down to two inches deep between waterings. For hydroponic setups, adjust your top-feed drip cycles to ensure the top faces of your rockwool slabs can dry out completely, naturally crushing the egg lifecycle.
Pro Habits to Block Future Insect Invasions
Once you have successfully cleared your grow room, put these professional biosecurity habits into place to make sure the flying pests never return:
- Fit Intake Vents with Fine Insect Screens: Cover every fresh air intake port with an ultra-fine mesh or a dedicated intake filter sock to prevent wild flies from being drawn into your room by the fans.
- Store Your Medium in Airtight Tubs: In my indoor tent, I found that immediately emptying opened bags of potting soil, coco, or perlite into heavy-duty plastic storage bins with sealing lids completely cut off hitchhiking bugs from nesting.
- Keep Ambient Air Moving Low: Aim a small, clip-on oscillating fan to blow a steady breeze right across the tops of your pots. This constant wind pattern makes it physically impossible for weak-flying pests to land, feed, or lay eggs.
- Clean Up Stagnant Runoff Instantly: Never allow nutrient water to pool or sit in your drainage trays. Stagnant, warm nutrient water builds up algae rapidly, providing a premium food source for wandering pests.
Frequently Asked Questions
Will flying soil bugs kill my established indoor plants?
While a massive, mature plant can handle a mild insect population without dying, a heavy infestation will cause noticeable growth stunting, leaf loss, and ruined yields. More importantly, the physical wounds left on the roots by chewing larvae provide an entry point for deadly fungal root diseases like Pythium.
Can I spray neem oil on the soil to kill the root maggots?
No, avoid drenching your growing medium with concentrated neem oil. Neem is incredibly thick and oily; pouring it directly into your root zone can coat the sensitive root hairs, choking off their ability to absorb oxygen and water, which stunts your plant severely.
How long do I need to keep up the organic treatments?
Because the entire lifecycle from egg to flying adult spans roughly 21 to 28 days, you must continue your drying cycles and apply BTI drenches consistently for a minimum of three consecutive weeks to ensure you catch every single generation.
Conclusion
Clearing flying soil pests out of your indoor garden doesn’t require turning your living space into a chemical hazard zone. By combining yellow visual traps to capture the adults with targeted, root-safe microbial drenches to clear out the subsurface larvae, you can return your garden to perfect health cleanly and safely.
Expert Tip: If you are growing in soil or coco coir and want a quick, impenetrable shield against these bugs, add a 1/4-inch layer of clean, coarse horticultural sand directly over the top of your pots. Adult gnats cannot dig through the heavy, sharp sand grains to drop their eggs, and any larvae trying to crawl out will get sliced and dehydrated. This instantly breaks the lifecycle without changing your nutrient PPM or pH.