
Few things are more frustrating than watching a vibrant indoor canopy suddenly look tired, wilted, or plagued by mysterious yellow spots despite perfect nutrient levels. In a soil-less system, subterranean pathogens like Pythium (root rot) are a silent, devastating threat. Because your water recirculates continuously, a tiny fungal spore introduced into your reservoir can infect every single plant in your system within hours. Without soil acting as a natural microbial buffer, your root zones are completely exposed to these waterborne invaders, leading to suffocating slime, nutrient lockout, and total crop failure before you even notice the first leaf drooping.
I’ve seen many growers struggle with unmitigated root diseases because they used aggressive, synthetic chemicals that threw off their water metrics. For a comprehensive look at balancing your reservoir without risking your plants, check out our deep-dive review on the most effective safe water treatments for overall hydroponic root health to safely fortify your system against harmful water molds.
Why Root Pathogens Dominate Indoor Hydroponic Tanks
Indoor hydroponics offers unmatched growth speeds, but it also strips away the natural defenses found in nature. In a typical indoor grow tent, your reservoir water completely lacks biological diversity. Outside, millions of competing bacteria, beneficial fungi, and microscopic predators balance the ecosystem, keeping harmful opportunistic molds in check.
Indoors, your system is highly vulnerable to three key triggers:
- Elevated Reservoir Temperatures: Intense LED or HID grow lights naturally heat up your grow space. When water temperatures cross the 72°F (22°C) threshold, its capacity to hold dissolved oxygen plummets.
- Stagnant Water Zones: Poorly placed water pumps or dead spots in your drainage channels allow anaerobic (oxygen-deprived) environments to form.
- Contaminated Clones or Mediums: Introducing unverified cuttings or unwashed rockwool can carry microscopic spores straight into your clean system, sparking an immediate outbreak in the warm, low-oxygen water.
Step-by-Step Identification: Spotting Root Disease Early
To prevent a minor issue from sabotaging your entire harvest, look deep inside your root zones, underneath the net cups, and around the rockwool bases daily:
- The Discoloration Shift: Healthy roots should be bright, glowing white or ivory. Pathogen-damaged roots turn a dull cream, transition to tan, and eventually turn a dark, muddy brown.
- The Gelatinous Slime: Check the texture of the root mass. If the root strands are matted together and coated in a slick, foul-smelling gray or brown slime, anaerobic bacteria have taken over.
- Structural Sloughing: Gently pull a single dark root strand between your fingertips. If the outer cortex easily slips off like a wet thread, leaving a bare, skeletal vascular core behind, your root system is actively rotting.
- Above-Ground Lower Leaf Spots: Look closely at the oldest, lower leaves. When roots fail, these leaves will develop erratic brown or yellow splotches, accompanied by a permanent daytime wilt that doesn’t fix itself when the lights go off.
The 3-Step Safe Organic Water Treatment Plan
You can reclaim your water quality and save your plants without using caustic chemicals that alter your reservoir’s PPM or spike your pH.
Step 1: The Bio-Sanitizing Reservoir Flush
Drain your entire nutrient reservoir immediately. Fill the system with fresh, plain, dechlorinated water and add a food-grade oxidizing agent like 34% hydrogen peroxide at a rate of 1 to 2 mL per gallon. Run this through your system for 1 to 2 hours. This acts as a safe, natural reset button, physically oxidizing fungal spores and dissolving dead root matter without leaving behind toxic chemical residues.
Step 2: Mechanical Root Sloughing and Trimming
Lift your plants out of their modules. Using clean, gloved hands, gently rinse the root masses under cool tap water to remove dead biofilm. Take sharp shears sanitized with isopropyl alcohol and trim away any black, mushy root sections. Removing this dead mass prevents it from decay and robbing oxygen from the remaining healthy tissue.
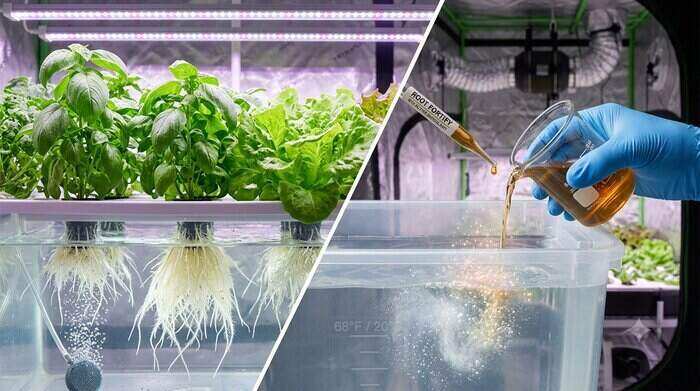
Step 3: Inoculate with Beneficial Bio-Predators
Refill your reservoir with fresh nutrients at a slightly lowered EC to reduce plant stress. Because you sterilized the system in Step 1, you must now introduce beneficial biology to guard the clean roots. Add a high-quality biological inoculant containing Bacillus amyloliquefaciens or Trichoderma harzianum. These organic, safe microbes aggressively colonize the root surface, creating a living shield that physically blocks pathogens from attacking the plant.
Pro Prevention Tips: Lock In Long-Term Root Health
In my indoor tent, I found that maintaining an aggressive preventative protocol is significantly easier than treating an active disease outbreak. Implement these cleanroom habits:
- Run High-Output Industrial Air Stones: Never skimp on dissolved oxygen. Use a heavy-duty air pump to keep your water constantly churning, ensuring oxygen levels stay above 8 ppm.
- Keep Water Below 68°F (20°C): This is a critical warning. Warm water is the number one cause of root rot indoors. Use a dedicated water chiller or insulate your reservoir tubs to keep water temperatures locked between 65°F and 68°F.
- Sanitize Tools and Meters Between Taps: Never dip an unwashed pH pen or measuring cup from an old reservoir into a fresh tank. Wipe all testing equipment with 70% isopropyl alcohol every single time.
Frequently Asked Questions (FAQs)
1. Can I use beneficial microbes and hydrogen peroxide together?
No, you cannot mix them simultaneously. Hydrogen peroxide is a non-selective oxidizer; it will instantly kill your expensive beneficial bacteria along with the bad pathogens. Choose either a completely sterile system loop (using peroxide regular maintenance) or an organic, living system loop (using beneficial biology).
2. How long does it take for roots to recover after a safe water treatment?
If you catch the infection early and deploy beneficial microbes, you should see fresh, fuzzy, bright white root shoots bursting out of the old brown root mass within 5 to 7 days.
3. Does tap water chloramine protect against hydroponic root rot?
While the small amounts of chlorine or chloramine in city tap water offer minor sanitizing properties, it is rarely concentrated enough to stop an aggressive indoor root rot outbreak. Furthermore, heavy tap water chloramine can stunt delicate root hairs over time.
Conclusion
Mastering safe hydroponic water treatments is a vital milestone for any serious indoor grower. By respecting your water temperatures, maximizing your dissolved oxygen levels, and enlisting the help of organic beneficial microbes, you can build an impenetrable defensive barrier right inside your reservoir.
Expert Tip: In my consulting work, I’ve found that a subtle drop in a plant’s daily water consumption is often the very first indicator of a root zone issue—even before the roots change color or the leaves wilt. Keep a daily mark on your reservoir tank wall; if your plants suddenly stop drinking their usual volume over a 24-hour window, pull the lid immediately and check for pathogens!