
There is nothing quite as frustrating as watching a vibrant, fast-growing indoor plant suddenly drop its leaves, turn yellow, or show stunted growth for no apparent reason. When root-devouring pests like fungus gnat larvae or thrips pupae invade a soil-less or hydroponic setup, they target the most critical part of your plant: the root system. Left unchecked, these hidden microscopic invaders destroy delicate root hairs, stripping away your crop’s ability to absorb nutrients and rapidly leading to systemic root rot.
Why Soil-Less and Hydroponic Systems Are Vulnerable
Indoor grow rooms and hydroponic systems create a paradise for root-zone pests. Outdoors, nature balances the scales with natural predators like rove beetles, parasitic wasps, and competing soil microbes. Indoors, we create an isolated environment with ideal temperatures, perfect humidity, and a constant supply of moisture.
Contaminated clones, unsterilized medium mixes, or even hitchhiking adult gnats entering through intake vents quickly establish colonies. Without natural predators to keep them in check, a single female fungus gnat can lay hundreds of eggs in your moist cocoa coir, peat, or rockwool, leading to an explosive pest population in just days.
Step-by-Step Pest Identification
Before applying beneficial nematodes, you need to confirm that root-zone pests are the actual cause of your plant’s distress. Here is where and how to look:
- Topsoil/Medium Surface: Look closely at the top 1–2 inches of your growing medium under bright light. You may spot tiny, translucent worms with black heads (fungus gnat larvae) wriggling near the stem.
- Under the Lower Leaves: Inspect the undersides of bottom leaves for silver patches, tiny black specks (frass), or faint webbing—classic signs of thrips or spider mites that spend part of their lifecycle in the medium.
- The Root Zone: Carefully inspect exposed roots or check your reservoir. Healthy roots are bright white and crisp. Pests leave behind slimy, brownish, frayed roots that strip easily when gently pulled.
- Yellowing and Wilting: Monitor lower leaves turning yellow from the outer edges inward, accompanied by unexplained wilting even when your medium is properly hydrated.
Timeline: How Long Do Beneficial Nematodes Take to Work?
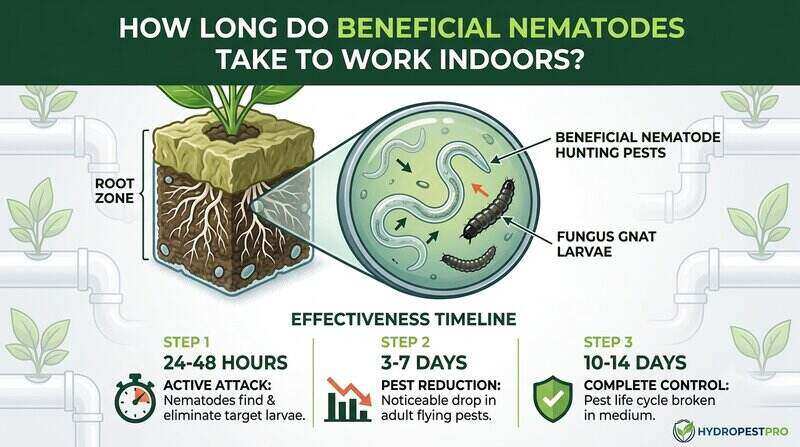
When introduced to an indoor environment, beneficial nematodes (Steinernema feltiae or Heterorhabditis bacteriophora) go to work almost immediately, but visible results take a few days.
Here is the realistic timeline for indoor applications:
- 24 to 48 Hours (The Attack): Once watered into the medium, nematodes actively seek out host larvae using chemical cues. They enter the pest, releasing symbiotic bacteria that kill the host within 24 to 48 hours.
- 3 to 7 Days (Population Decline): You will notice a drastic reduction in adult pest activity above the medium as the larva generation is eliminated before reaching adulthood.
- 10 to 14 Days (Complete Control): The nematodes reproduce inside the dead hosts, releasing thousands of new microscopic hunters back into the medium. At this stage, the pest cycle is broken.
3-Step Organic Action Plan
Eliminating pests organically requires a methodical approach that won’t disrupt your nutrient solution or shift your reservoir pH/PPM.
Step 1: Flush and Flush-Prep
Gently flush your medium with fresh, pH-balanced water to remove excess mineral salt buildup. High electrical conductivity (EC) can stress beneficial nematodes. Ensure your water is free of chlorine and chloramines, which will kill biological controls on contact.
Step 2: Apply Beneficial Nematodes
Mix your nematodes into room-temperature, unchlorinated water ($65°F–72°F$). Apply the mixture directly to the root zone or top of the growing medium using a watering can or soft pump sprayer. Turn off heavy UV sterilizers or strong overhead lights for 24 hours post-application, as nematodes are light-sensitive.
Step 3: Maintain Optimal Medium Moisture
Keep the medium evenly moist—but not waterlogged—for 7 to 10 days post-application. Nematodes require a thin film of moisture on particles to swim through the root zone and hunt down remaining larvae.
Pro Prevention Habits for Indoor Growers
To ensure pests do not return after your treatment cycle finishes, adopt these four habits:
- Deploy Yellow and Blue Sticky Traps: Place sticky traps at the surface of your medium to catch adult fliers before they lay new eggs.
- Quarantine New Material: Never bring outside plants, unverified clones, or open bags of growing medium directly into your main tent without a 14-day quarantine.
- Intake Air Filtration: Cover all tent air intake ports with fine mesh filters (HEPA or bug screens) to stop airborne pests from flying inside.
- Sterilize Equipment Between Runs: Clean pots, reservoirs, and tools with food-grade hydrogen peroxide or isopropyl alcohol between crop cycles.
Frequently Asked Questions
Can I use beneficial nematodes directly in a pure hydroponic system (DWC or NFT)?
Yes, but they are most effective in media-based systems (coco, rockwool, soil). In deep water culture (DWC), ensure you maintain high aeration, as nematodes require oxygen to survive in water environments.
Will beneficial nematodes ruin my hydroponic nutrient reservoir?
Not at all. Beneficial nematodes are living microscopic organisms; they do not contain chemicals, heavy salts, or synthetic compounds that alter your reservoir’s pH or PPM readings.
How often should I reapply nematodes indoors?
For active infestations, apply a second dose 10 to 14 days after the first treatment to ensure any late-hatching eggs are destroyed. For maintenance, a preventative dose every 4 to 6 weeks works well.
Final Thoughts
Pests in the root zone can feel overwhelming, but relying on harsh chemical pesticides indoors often does more harm than good to your plants and indoor air quality. By deploying beneficial nematodes, you let nature do the heavy lifting safely and organically.
Expert Tip: Apply your beneficial nematodes right before your indoor lights click off for the night cycle. This gives these light-sensitive organisms maximum time to burrow deep into the root zone without stress from intense grow lights!