
Few things match the sheer panic of lifting your hydroponic reservoir lid only to find a thick, suffocating layer of brown or clear slime blanketing your plumbing and pump filters. Yesterday, your plants were thriving; today, they are suddenly wilting, exhibiting mysterious leaf spots, and looking completely defeated. In a soil-less system, reservoir slime is a catastrophic threat. This jelly-like biological film blocks your roots from absorbing nutrients and actively strips oxygen right out of the water. Without soil to act as a buffer, your root zones suffocate rapidly, leading to irreversible root rot and a completely dead system in a matter of days if left unchecked.
Choosing how to tackle this gooey invader usually pits two heavy hitters against each other: chemical sterilization versus mechanical temperature control. I’ve seen many growers struggle with trying to clear out persistent biofilms using under-dosed solutions that only make the pathogens more resilient. If you are leaning toward an immediate, budget-friendly fix to blast the slime away, read our comprehensive guide on using H2O2 as a root zone oxygenator to discover how this powerful molecule sanitizes your water while supercharging your root zone’s recovery.
Why Reservoir Slime Explodes in Indoor Hydroponics
Indoor grow setups are highly controlled, but they are also uniquely vulnerable to slime-producing organisms like bacteria, cyanobacteria, and micro-fungi.
Indoors, this problem is driven by a few distinct factors:
- The Warm Water Trap: Powerful LED or HID grow lights radiate heat downward. In a closed grow tent, this ambient heat warms your nutrient reservoir. Once water temperatures climb past 70°F (21°C), dissolved oxygen drops, creating a low-oxygen playground for anaerobic slime.
- Light Leaking Into the Root Zone: Any gap around your net cups, rockwool cubes, or reservoir lids acts as an open window. When indoor grow lights hit stagnant, nutrient-rich water, it triggers a massive bloom of photosynthetic slime and algae.
- Zero Microbial Competition: Because an indoor system lacks the diverse, balancing ecosystem of natural soil, an introduced pathogen faces absolutely zero biological resistance. It can multiply unchecked, colonizing plastic surfaces into a stubborn biofilm within 24 hours.
Step-by-Step Identification: Spotting the Slime Early
Catching this problem before your roots turn into a mushy, black mass is vital. Grab a flashlight and check these specific areas during your daily maintenance check:
- The Pump Intake Filter: Pull your water pump out of the reservoir. Look inside the plastic grate. If it is clogged with a slick, translucent jelly or thick brown sludge, slime has colonized your system.
- The Root Texture Feel: Gently touch the root mass dropping below the net cups or rockwool. Healthy roots feel firm and crisp like bean sprouts. Slime-infected roots feel slippery, greasy, and matted together like wet hair.
- The Aeration Line Film: Run your fingers along the submerged airline tubing and air stones. Slime love porous and plastic surfaces; it will form a thick, rubbery coating here long before it completely darkens your roots.
- The Water Odor: Take a sniff right over the open reservoir lid. Clean water has no smell or a faint earthy aroma. A slime-compromised tank will emit a distinct sour, swampy, or metallic stench.
The 3-Step Organic Slime Elimination Plan
If your system is already slimed, you can wipe it out using safe, organic practices that protect your plants and won’t permanently wreck your nutrient water’s baseline pH or PPM.
Step 1: The Mechanical Wash and Polish
Drain your entire slimed reservoir immediately. Take your plants out of the system and carefully rinse the root masses under cool, running tap water, gently sliding the worst of the jelly film off the roots with your fingers. Next, scrub down the interior walls of your reservoir buckets, pumps, and air stones using a stiff brush and hot water to break up the sticky biofilm anchor layers.
Step 2: The High-Oxidation Flash Sterilization
Refill your system with plain, clean water (hold off on the plant nutrients for now). Add a shock dose of 34% food-grade hydrogen peroxide at 3 to 5 mL per gallon of water (or roughly 3 tablespoons of standard 3% peroxide per gallon). Run your water pumps for a clean 2 to 3 hours. This intense flash treatment will chemically oxidize the remaining microscopic slime cells on contact without leaving behind any toxic chemical residues.
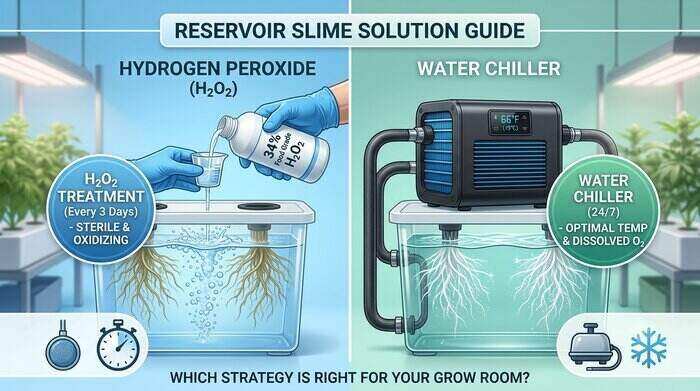
Step 3: The Long-Term Decision (H2O2 vs. Chiller)
Once the system is sterilized, drain it one last time and mix a fresh nutrient batch. Now, you must choose your long-term management strategy to keep it from returning:
| Strategy | How It Works | Impact on System |
| The Hydrogen Peroxide Routine | Add a maintenance dose (1 mL of 34% or 1 tbsp of 3% per gallon) every 3 days. | Keeps water sterile, adds oxygen, but requires constant manual reapplication as it degrades into water within 72 hours. |
| The Water Chiller Integration | Install an inline chiller to lock water temperatures at a crisp 65°F to 68°F (18°C – 20°C). | Permanently solves the root cause by maximizing dissolved oxygen naturally so anaerobic slime can never grow. Completely automated. |
Pro Prevention Tips: Lock Out the Slime for Good
In my indoor tent, I found that preventing slime is infinitely easier than fighting it once it takes over your plumbing. Adopt these cleanroom habits:
- Seal Out Every Tiny Light Leak: Use black vinyl tape, foil insulation, or dark neoprene inserts to cover every square millimeter of your reservoir lids and around the base of your rockwool cubes.
- Install an Inline Water Chiller: If your budget allows, a water chiller is the ultimate “set-and-forget” solution. Keeping water cold is nature’s best way to stop slime dead in its tracks.
- Sanitize Tools Between Reservoirs: Never use the same measuring cup, EC wand, or mixing spoon in different tanks without dipping them in a 70% isopropyl alcohol bath first.
Frequently Asked Questions (FAQs)
1. Can I use beneficial microbes while running a hydrogen peroxide regimen?
No, you absolutely cannot combine them. Hydrogen peroxide is a non-selective oxidizer. It cannot tell the difference between bad slime and expensive beneficial bacteria (Bacillus amyloliquefaciens). It will instantly kill both. You must choose a completely sterile system (H2O2) or a living system (beneficial microbes).
2. Is clear reservoir slime different from brown reservoir slime?
Clear or white slime is typically a bacterial biofilm, often triggered by a light leak or organic sugars leaking from stressed roots. Brown slime is usually a mix of cyanobacteria, algae, and advanced Pythium (root rot) that has begun to rot the inner root tissue. Both are dangerous and treated the same way.
3. Will a water chiller eliminate slime if I already have a light leak?
A water chiller will drastically slow down slime growth because cold water holds high levels of oxygen, which anaerobic pathogens hate. However, if intense indoor grow lights are shining directly into your nutrient water, photosynthetic algae and cyanobacteria will still eventually find a foothold. You must block the light.
Conclusion
Whether you choose the immediate, aggressive sanitizing power of hydrogen peroxide or invest in the permanent, preventative control of a water chiller, defeating reservoir slime comes down to consistency. Keep your root zones dark, keep your equipment sterile, and never let your water sit stagnant in a warm room.
Expert Tip: If you are caught in a pinch and don’t have a water chiller yet, swap out a couple of frozen plastic water bottles directly into your reservoir tank twice a day during the peak afternoon heat. In my consulting work, I’ve found this simple, free trick can drop reservoir temps by 4 to 5 degrees—just enough to keep your dissolved oxygen high and buy you time until your next maintenance cycle!